Last Updated on March 3, 2023

How to Prepare a Door to Install a Door Lock
Installing a door lock can be rather complex, but with the right guidance, any homeowner can install a door lock. In this article we teach you how to prepare a door for a fresh installation of a new door lock (that is, how to drill the door). If you are simply replacing a door lock, check out our article “How to Replace a Door Lock.”
Learn to:
Tools Needed to Install a Door Lock
How to Bore the Door for the Lock
Chisel for the Latch Plate
Prepare the Door Frame for the Latch
Adding a deadbolt lock to your entry door is typically handled by a licensed locksmith, especially if you’re not comfortable with power tools. But if you are good with tools it is a home improvement project you can take on to add to your safety and security.
Installing an extra deadbolt on door increases the force impact area by 50%-100%. This makes it much harder to force the door open during a home invasion.
But how do you install a deadbolt when there’s no hole? I’m going to tell you. These instructions are general and will work for the installation of knobs or deadbolts on wood, fiberglass, or steel doors.
If there are holes in the door that won’t be used for new locks and need to be covered up, check out our article, “How to Cover Door Holes.”
Tools Needed to Prepare a Door for Lock Installation

- A new deadbolt lock and you may need batteries if you are installing an electronic lock.
- Philips screw drivers
- Tape measure and ruler
- Pencil
- Masking tape
- Drill with driver
- Drill bits: 2 1/8 inch and a 1-inch
- A hammer, chisel, dust mask and safety glasses
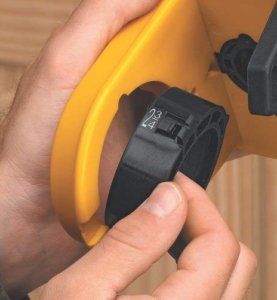
- A lock set template or jig.
This will make the job must easier than without it and many of the jigs come with the drill bits needed to complete the installation. The favorite from our locksmiths can be found here on Amazon. It comes with the drill bits you will need.
Locksmith-Tip: measure your door’s thickness to be sure it is between 1 3/8 and 1 3/4 of an inch. If it is thicker, you will need to order an extension kit for the lock you are installing.

Decide where you want the lock to be placed. Typically, we place them about six to twelve inches above the door handle or existing door deadbolt.
Draw a horizontal line at this point on the interior side of the door and the jamb to mark them.
Prepare the Door for the Lock Installation – Bore the Door
You might find it easier to remove the door from the hinges and work on sawhorses to bore the holes, but it is not necessary.
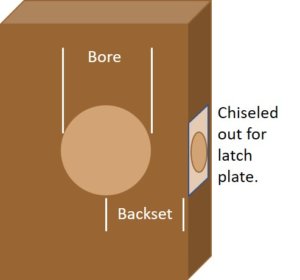
Select the backset on the template/jig. The backset is the distance from the edge of the door to the center of the hole. Typically it’s either 2 3/8 inches or 2 3/4 inches.
You’re going to want to match the placement of the existing locks on the door so that they align vertically. If you are not sure, measure from the edge of the door to the center of an existing lock on the door.
Align the template so it’s centered on the line you drew earlier. The template we recommended has a hole so you can clearly see the line at center. Then secure it to the door.
In some cases you will secure the drill template using a clamp that came with the template. In other cases, the template is held in place by drilling the two 1/8 inch pilot holes on the edge of the door. These pilot holes are later be used for the latch plate screws so there will be no extra holes in the door.

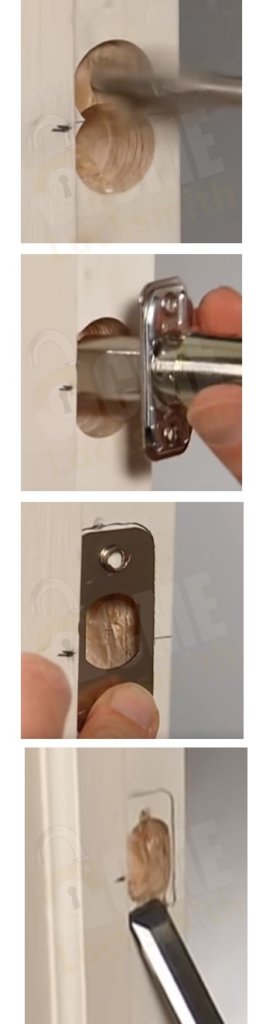
Now use the 2 1/8 inch hole saw that came with the installation kit, drill the hole (bore the door) for the lock body. Locksmith Tip: To prevent the door from splintering drill halfway through one side and then drill the rest from the other side.
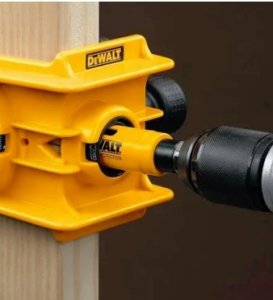
Use a 1-inch drill bit or hole saw that came with the lock installation kit, to drill the hole on the door edge that the latch will be installed in. Then remove the template from the door.
Prep the Door for the Lock Latch Plate
Next, you will need to cut out the edge of the door for the latch plate. There are a couple of possibilities here:
1. Use the latch plate that came with the locks and trace it on the edge of the door. Then use a chisel to chisel out for the latch plate. It is important to use a good, sharp chisel for this. Our locksmiths prefer the Dewalt chisel found here on Amazon.
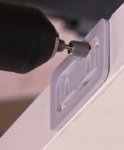
2. Your lock may have come with a template for the latch plate or you can get them on Amazon. The template is secured to the two pilot holes you drilled earlier and a drill with a router bit can be used to carve out the outside edge of the plate. Then the chisel is used to take out the middle. If you got a template with your lock, this will make for a much nicer installation.
3. The template / jig you purchased may also have come with strike template. You place this template on the door and strike it with a hammer. It will cut groves into the door and then the inside of these groves are chiseled out to make room for the faceplate. The groves created act as a guide and you want them deep to prevent splitting while chiseling out for the plate. We use the strike plate from Kwikset that can be found on Amazon.
Your door is now prepped for the lock. Let’s talk about the frame.
Prep the Door Frame for the Lock’s Latch
At the mark made earlier, drill two holes, one above the mark and one below the mark. You are basically drilling a figure 8 with the center of the 8 at the mark you made earlier. Now chisel this out to straighten and flatten the sides.
Locksmith Tip: To ensure your new deadbolt locks properly, the hole you have drill must allow the latch to fully extend into it. See How to Ensure Proper Lock Installation.
Put your latch up against the hole, centered on your mark, and trace it, or use a provided jig that came with the lock, or use a strike template that came with your template/jig as above to mark the area that you will need to chisel out for the door frame strike.
Once the strike area is chiseled out, put the strike in, drill two 1/8 inch pilot holes, and install the strike to the door with two screws.
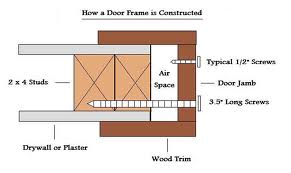
Locksmith Tip: If your strike came with ½ inch screws, throw them away and use two 3” screws for this. The 3” screws will secure that strike to the 2 X 4 stud behind your framing for a huge boost in home security.You have now completed the prep for the new lock and you are ready to put the new lock into the door. See our article:
Installing a Door Lock into an Existing Holes (that you’ve just created).
Disclosure: As an eBay / Amazon Associate I may earn from qualifying purchases.