Last Updated on May 15, 2024
Which Door Locks to Buy | Rekey the New Locks | Thick Door Kit | Remove Old Lock | Replace the Latch | Install New Lock | Check Latch Alignment (Do NOT Skip) | Video: Replacing Bathroom Door Knob
Replacing a lock on a door is a simple process that most homeowners can readily handle. But if you get it wrong, your home security can be put at risk. This helpful guide will make sure you do it right.
You can change a door lock following these steps: buy a new lock that matches your existing lock’s keyway, rekey the new lock to your existing house key, remove the old lock, install the new latch, install the new lock body, check for proper latch operation to ensure your door will secure properly.
If you’re looking for a door lock change in Phoenix, schedule service with ACME Locksmith online.
New Lock Considerations – Before the Lock Change
Most lock products today are built to be affordable, and by that I mean cheap. So, they will eventually stop working and because they are so inexpensive, it is better to just replace the lock than to try and repair it.
If you haven’t yet purchased your new door hardware, take a look at our article on our favorite lock brands and our favorite smart locks.
Which Lock Should You Buy?
If the lock is going onto an entry door, buy Grade 1 or Grade 2 replacement locks (at least Grade 2). These locks will have anti-bump and pick measures already installed, and they are more robust than grade 3 locks.

Buy Replacement Locks of the Same Keyway
If you are swapping out a lock(s) that use(s) a key, you need to buy the same lock brand as your existing lock brand or buy a brand that will allow you to use the same key as the house key you already have.
There are two major keyways installed on homes within the United States. Schlage (SC1) and Kwikset (KW1). The following table shows other brands that may be able to use one of those keyways.
Have the New Lock Rekeyed to Your Existing House Key
Take the locks you bought to your local locksmith so that they can be rekeyed to match your existing house key. This way, you will still have one key for every lock in the house and not be stuck with two keys.
Will You Need a Thick Door Kit?
3Before changing your existing door locks, measure the width of your door.
Locks purchased off-the-shelf are for standard door widths of 1 3/8 to 1 3/4 inch. If your door is thicker than that you will need to purchase a thick door kit for whatever brand of lock you are replacing.
Thick door kits contain longer screws and a longer tail piece (for deadbolt) or spindle extension (for door knobs).
Check the Backset Measurement

Backset is the measurement from the center of the hole in the door (or the center of the lock if the old lock is still installed) to the edge of the door.
Off-the-shelf locks are designed for either 2 3/8″ or 2 3/4″ backsets. Many locks can use either of those two backsets by selecting a setting on the lock’s latch.
If the center of your lock is 5” away from the edge, you are going to need to buy an elongated latch and bolt. Locksmiths carry these and will make sure you get the right ones for your door locks. But if you want, you can buy them on Amazon as well.
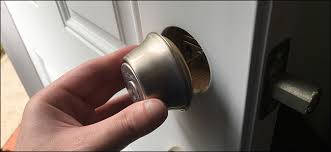
How to Remove the Existing Lock
Bottom Image: Screws Holding Lock On
Tools Needed
Philips Head Screwdriver
Small-tip regular screwdriver (possibly)
Small hammer (possibly)
Removing the Screws Holding the Lock On
Two screws hold the lock on the door. They may or may not be visible, but in all cases, they will be on the interior side of the door.
If they are not visible, they are usually under the rosette (the flat piece pressed up against the door). You will see a dimple on the rosette and see if it can be popped off with a small flat-head screwdriver.
Some deadbolts come with a snap-on cover that conceals the internal screws. You will need to pop that cover off to get to the screws and remove the deadbolt lock from the door. This is common for Schlage deadbolts. A small flathead screwdriver will help you get the cover plate off.
The screws securing the lock to the door can be fairly long. Once you loosen each screw it will be quicker to remove them by turning by hand than by the screwdriver.
When removing these screws it is also helpful to each piece of the lock together with your free hand while unscrewing. This will keep the tension off the screws so you can quickly remove them by hand and it prevents the lock from accidentally falling out and damaging any tile that may be installed.
When the screws are out, both sides of the lock will simply slide off, leaving only the latch in the door.
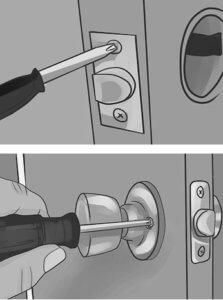
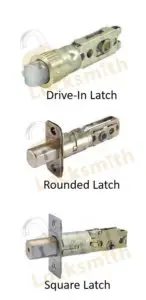
Removing the Lock Latch / Bolt
There will, most often, be two screws holding the bolt / latch in the door. Remove these screws and pull the bolt / latch out of the door.
If your lock is a drive-in latch, you will not see a plate on the door and thus you won’t see any screws. Drive-in latches are held in place by compression on a shield around the latch. This type of latch may need to be tapped out with a screwdriver and hammer.
Place the screwdriver inside the door hole and against the spindle hole within the latch (photo). Tap outward to extract the latch from the door.
Installing the New Door Lock
The installation process is essentially the reverse of removal.
Tools Needed
Philips Head Screwdriver
Small hammer (possibly)
Small chisel (possibly)

Adjustable Backset
Insert the New Lock Latch
Remember the backset measurement you took earlier? Now is the time to set the new latch, or bolt, to support that measurement. Set the new latch to either the 2 3/8″ or 2 3/4″ setting. If you don’t recall the backset, you can remeasure it or see if the latch you removed has a setting so you can read what it was set to.
If the new latch is identical in style and has the same type of corners on the latch plate you can skip the points below.
- New latch square corner, old latch round corner. You will need to chisel out the old rounded corners to make them square to install the new latch.
- New latch round corner, old latch square corner. It will fit but there will be gaps at the rounded corners. They pose no security risk if you don’t mind them or you can putty over them with filler if you do.
- New latch square or rounded, old latch drive-in latch. This is the most difficult installation as it will require chiseling out to make room for the new latch plate. I’d recommend replacing existing drive-in latches with drive latches to avoid this. But if that is undesired or not possible, you can purchase latch guides. The latch guides will mark for you where you will need to chisel. You hit them with a hammer to cut an impression in the door and then chisel out the inside of this impression. Level of skill – Difficult. Here’s our favorite latch guide template by Kwikset on Amazon.
- Drive-in latch into either of the other two. Unattractive because of the existing chiseled-out space for the old latch, but with the correct lock adjustments, no security risk.
- In some cases, the new latch plate may be just a bit bigger than the old one and need to be chiseled out to accommodate it.
Once any modification has been completed, the new latch or bolt can be inserted and screwed into the door. If you are installing a latch (for a doorknob or lever) be sure it is inserted so that when the door is closed the latch is pushed in by the door frame as the door closes. If it is installed backwards it will hit the frame and the door won’t shut.
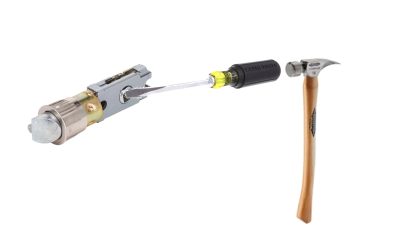
Proper Installation of a Drive-in Latch

Drive-in latches are meant to fit snugly. The best installation method is to push the latch in as far as you can and then place a piece of flat wood tight up against the latch. Then tap it with a hammer to finish pushing the latch into the door.
Once your latch is in, I like to install the screws last (after the rest of the lock is installed). It just gives wiggle room to make sure everything goes together easily.
At this point, you want to check to make sure that the center hole in the latch assembly is aligned to the center of the hole in the door. If it is off to the left, or off to the right, the latch will need to be removed and adjusted to the other of its two positions “short” or “long”.
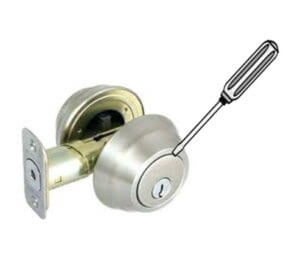
Install the New Doorknob or Deadbolt
Place the Exterior Side of the Lock Through the Latch/Bolt
Start by putting the exterior side of the door knob or deadbolt into the hole.
Locksmith Tips:
- Keyed Locks – When putting on a keyed exterior lock piece, be sure that the pins are on the top side of the lock. If it is put in upside down, dust and other debris will quickly fill the pin locations making the lock difficult to use. The lock should be installed so that the cut side of a key, when slid into the hole, is facing up.
- Before changing your lock, be sure to have your local locksmith key your new locks to your existing house key by taking the new locks to the nearest locksmith shop.
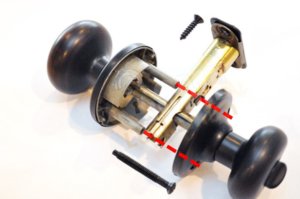
The exterior side of your door lock has two rods with threads in them. These are called screw posts. The latch will have two holes that you will slide these rods through to ensure proper lock alignment (image).
There is also a center rod on the exterior piece of the lock. For doorknobs, it’s called a spindle and for deadbolts, it’s called a tailpiece. When you line up the screw posts these pieces will naturally align and the two lock sides should slide right together.
Install the Interior Side of the Lock
While holding the exterior side of the lock on the door with one hand, place the interior side of the lock into position.
Place one of the screws into a screw post and begin to thread it by hand.
Place the second screw into the other screw post and begin to thread it by hand.
They should go in easily. Finish tightening the screws.
Check for Proper Installation – Important Security Step
If you are changing a keyed door knob or lever with a latch, this is VERY important!
Locks only work when they are installed correctly and when you change a lock there are two very important things you must check for your lock installation to be secure.
Door Latch Security – Knobs, Levers, and Handle Set Plunger Activation

See that little extra piece of material on that latch (image)? It’s called a deadlocking plunger. Do you know what it’s for? Well, it serves to lock the latch in place so it can’t be moved/slid back into the open position by a credit card or screwdriver. It is extremely important for home security to adjust this when installing keyed door knobs, levers, or handle sets.
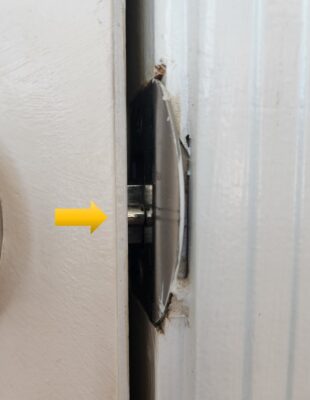
When the latch is in the out position and the door is closed, the latch should be pushing that plunger into the door. When it pushes the plunger into the door it locks the latch in place so it can’t be forced open (see video below).
If the door or strike are misaligned, or if someone has ground out the latch hole too big, the plunger will not be pushed in and the lock with the latch can be very easily bypassed with a credit card or screwdriver.
You can view whether or not the plunger is being pushed in correctly by looking through the crack from the inside of the door. If the plunger is not being pushed in, the strike plate (metal plate on the door frame) will need to be moved so that it is.
Watch Me Get Into a Locked Door Where the Latches Aren’t Installed Correctly
Deadbolt Installation Security – Proper Hole Depth in Frame
If you’ve bought yourself a good deadbolt you’ve bought one with at least a 1” throw. That means the bolt will slide out 1” from the door.
If your old deadbolt did not throw out this far, the hole in the door may not be deep enough for the new deadbolt and it will not secure properly.
When a deadbolt’s bolt does not fully extend outward, it can simply be slid back into the door. Burglars just use a knife or other object to slowly maneuver the bolt back into the door, bypassing the lock.
When the deadbolt is fully extended, it cannot be pushed back into the door because it locks in place in the fully extended position.
Test the door when open to see where the thumb turn is positioned when the deadbolt is fully outward. Then close the door and test again to make sure that the thumb turn goes to the same position.
You should be able to either hear or feel when the deadbolt fully extends. If it does not fully extend, you will need to drill out the hole in the door frame a little deeper until the bolt fully extends into it when the door is closed.
Disclosure: As an eBay / Amazon Associate I may earn from qualifying purchases.
Leave a Reply