Last Updated on June 19, 2026
To clear a garage door opener from a car, or wipe every remote at once, you do not need the car or the old remotes. press and hold the Learn button on the garage opener motor unit until the indicator light goes out, about 6 to 10 seconds. That erases every programmed remote, keypad, and in-car HomeLink. Then re-add only the remotes you have. The Learn button color tells you the procedure for Chamberlain, LiftMaster, Wayne Dalton, and Genie, all below. Just bought a home? Also rekey the locks.
Chamberlain | Liftmaster | Wayne Dalton | Genie | Programming a Car to Open the Garage
Clear the Opener, Not the Opening Device
You’ve just bought a home. How many remotes did the previous owner leave you? One? That’s a problem. Every garage door opener on the market comes with two remotes, so if you just have one, there is another door opener floating around out there.
Even if they’ve left you with two garage remotes, cars can now be programmed to open the garage door via HomeLink. HomeLink is a built-in wireless transmitter in many cars, found on the visor or rearview mirror, that you can program to operate your garage door opener. How do you remove the garage door from their car, when you don’t have that car in your possession?
To erase the garage door opener codes from any car, and erase all existing remotes, you don’t need any of the opening devices in our possession. You reset the garage door opener itself. This clears everything, and everything that had been previously programmed will no longer work. You then add the openers / cars that you have in your possession back into the garage door opener so they will again open the garage.
You will find instructions to clear the memory and add remotes for the Chamberlain, Liftmaster, Wayne Dalton and Genie garage door openers below.
Prefer a video demonstration? Check out our YouTube video on How to Clear a Garage Door Opener and Add Remotes.
How to Program Chamberlain Garage Openers
How to Reset
- Locate the LEARN button on the garage door opener. On many Chamberlain garage remotes it will be a purple square button. It may also be yellow and round. Note, the button may be behind the plastic light cover. Look for the plastic light cover that has the antenna wire hanging from it.
- Press and hold the LEARN button on the door control until the LED turns off (approximately 6 seconds).
- All previous codes are now erased. Add back in each remote control, keypad, or car you wish to work with the garage door.
How to Add Remotes
- Press and immediately release the LEARN button. The LEARN LED will glow steadily.
- Within 30 seconds, press the button on the remote control that you wish to operate your garage door.
- The garage door opener lights will flash or two clicks will be heard. The remote control is programmed.
How to Program Liftmaster Garage Openers
How to Clear
Liftmaster and Chamberlain are now the same company and the procedure is the same as that for the Chamberlain. You may find purple, yellow, or red learn buttons.
How to Add Openers
Liftmaster and Chamberlain are now the same company and the procedure is the same as that for the Chamberlain.
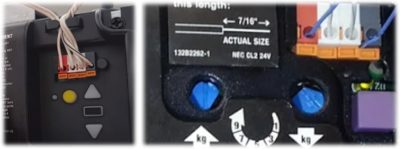
How to Program Wayne Dalton Garage Openers
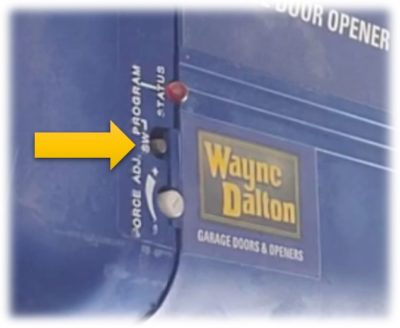
How to Reset
- Press and hold the Program button for 10 seconds
- The STATUS light and overhead light will flash 3 times indicating a successful erase operation.
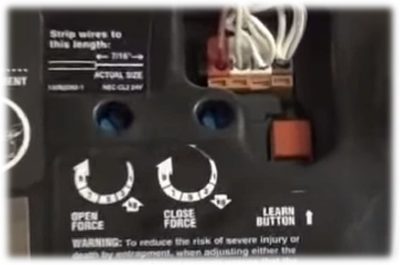
How to Add Remotes
- Press the “Program” button quickly. On a Wayne Dalton garage door opener, the program button is normally a little grey, square button.
- The led light will light
- Press the button on the remote you want to add to the garage door opener
- The STATUS light and overhead light will flash 3 times indicating a successful erase operation.
How to Program Genie Garage Opener
How to Erase
- Press and hold the Learn Button for 10 seconds or until Learn Indicator LED Light goes out. On a Genie Opener, the learn button is normally a red circle button but it can also be black. You may need to remove the plastic light cover to see the button. Look for the plastic light cover that has the antenna wire hanging from it.
How to Add Remotes
- Press and release the Learn button. The red learn LED light will blink 2 times per second.
- Press the Remote control button once within 30 seconds. The red learn LED Light will stay lit.
- Press the remote control button again. The red learn LED light will go out, indicating that memory is stored.
How to Program Your Car to a Garage Door Opener With HomeLink
HomeLink works with almost every garage door opener made in the last 30 years. If your opener was made after about 1996 it uses a rolling code, which changes the signal every time for security.
If the car is new to you, start by clearing the HomeLink buttons
Put the key in the on position without starting the engine, then press and hold the two outer HomeLink buttons until the indicator light starts flashing, usually about 20 seconds. Let go. This wipes any old codes so you are starting clean.
Programming your car to open garage doors that do not use rolling codes
Hold an existing, functioning handheld remote an inch or two from the HomeLink button you want to use on the mirror.
Press and hold the button on the handheld remote and the HomeLink button at the same time.
Keep holding both. Watch the HomeLink indicator light. It will blink slowly at first, then switch to a rapid blink or go solid. That rapid blink means HomeLink picked up the signal. Let go of both buttons.
If you have an older fixed-code opener, you are done. Press the HomeLink button and the door should move.
If nothing happens, your opener is almost certainly a rolling-code unit and needs one more next step.
Programming your car to open garage doors that do not use rolling codes
For a rolling-code opener, you have to tell the motor to accept the car. Get the ladder out.
Go to the car and either start the car of have the car in accessory mode.
Hold an existing, functioning handheld remote an inch or two from the HomeLink button you want to use on the mirror.
Press and hold the button on the handheld remote and the HomeLink button at the same time.
Keep holding both. Watch the HomeLink indicator light. It will blink slowly at first, then switch to a rapid blink or go solid. That rapid blink means HomeLink picked up the signal. Let go of both buttons.
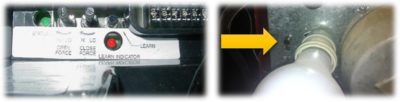
Go to the garage door opener and find the Learn button on the opener motor in the ceiling, usually near where the antenna wire hangs down. It is often under a light cover and may be colored.
Press and release the Learn button.
You now have about 30 seconds . Go back to the car and press the programmed HomeLink button firmly, hold for a second, release, and repeat two or three times until the door responds. Once the door moves, the car is paired.
One more thing worth knowing. Newer cars with HomeLink 5.0, roughly 2016 and up, sometimes work in reverse. Instead of teaching the car from the handheld remote, you press the Learn button on the opener first and then follow the prompts on the car’s screen, no handheld remote needed. If your visor buttons look like a touchscreen menu instead of three plain buttons, follow the on-screen instructions and use the Learn button method.
Video: How to Clear a Garage Door Opener
Disclosure: As an Amazon Associate I earn from qualifying purchases.